If you want Everest views without following the busiest trail to Base Camp, the 10 days Gokyo Lakes Trek is one of the smartest choices in the Khumbu. It gives you high mountain scenery, Sherpa villages, glacier landscapes, and the famous turquoise Gokyo lakes in a shorter timeframe, but it also demands good pacing because you climb above 5,000 meters quickly.
For many trekkers, this route feels more peaceful than the standard Everest Base Camp trail. You still fly to Lukla, walk through Namche Bazaar, and enter the heart of the Everest region, but once the trail turns toward Dole and Machhermo, the crowds thin out. What you gain is a quieter trekking experience with wide valley views, a close look at the Ngozumpa Glacier, and one of the best viewpoints in Nepal from Gokyo Ri.
This trek suits people who want a high Himalayan experience in limited time, but it is not a shortcut for unprepared travelers. Ten days is enough for many fit trekkers if the itinerary is planned carefully, includes acclimatization, and avoids rushing after Namche.
Is a 10-day Gokyo Lakes trek realistic?
Yes, a 10-day Gokyo Lakes trek is realistic for trekkers with decent fitness and no major altitude issues, especially if the plan includes two key acclimatization points. The route is shorter than some longer Everest itineraries, but altitude is still the main challenge, not daily walking distance.
Most days involve 4 to 7 hours of trekking, which is manageable for active hikers. The bigger concern is that you sleep above 4,000 meters for several nights and usually reach Gokyo Ri at 5,357 meters. That means your body needs time to adjust, even if the trail itself is not technical.
If you have never trekked at altitude before, you should take the itinerary seriously. A fast schedule can work, but only if your ascent is structured well and you listen to your body on the trail.
10 days Gokyo Lakes Trek itinerary
A practical route usually starts and ends with Lukla flights and keeps the focus on safe elevation gain.
Day 1: Fly to Lukla and trek to Phakding
After the mountain flight to Lukla, the first walk to Phakding is fairly easy. This helps you settle into the trail and avoid overexertion on day one. Overnight altitude is comfortable, which is useful after travel.
Day 2: Phakding to Namche Bazaar
This is one of the tougher early days because of the long climb into Namche. You cross suspension bridges, enter Sagarmatha National Park, and gain significant elevation. If the weather is clear, you may catch your first distant Everest view on the way up.
Day 3: Acclimatization day in Namche
This rest day should not be a full rest in bed. A short acclimatization hike to nearby viewpoints or villages helps your body adjust better than staying inactive. Namche is also the best place on the route for last-minute supplies, bakeries, gear checks, and ATM access, though you should never rely fully on cash withdrawal there.
Day 4: Namche to Dole
From Namche, the trail branches away from the main Everest Base Camp route. The walk includes ups and downs before the final climb to Dole. This day often feels longer than expected, but the mountain views open up nicely.
Day 5: Dole to Machhermo
This is a steady ascent through open terrain with increasing exposure to high-altitude conditions. Machhermo is a common overnight stop before Gokyo and a sensible place to sleep rather than pushing too high too soon.
Day 6: Machhermo to Gokyo
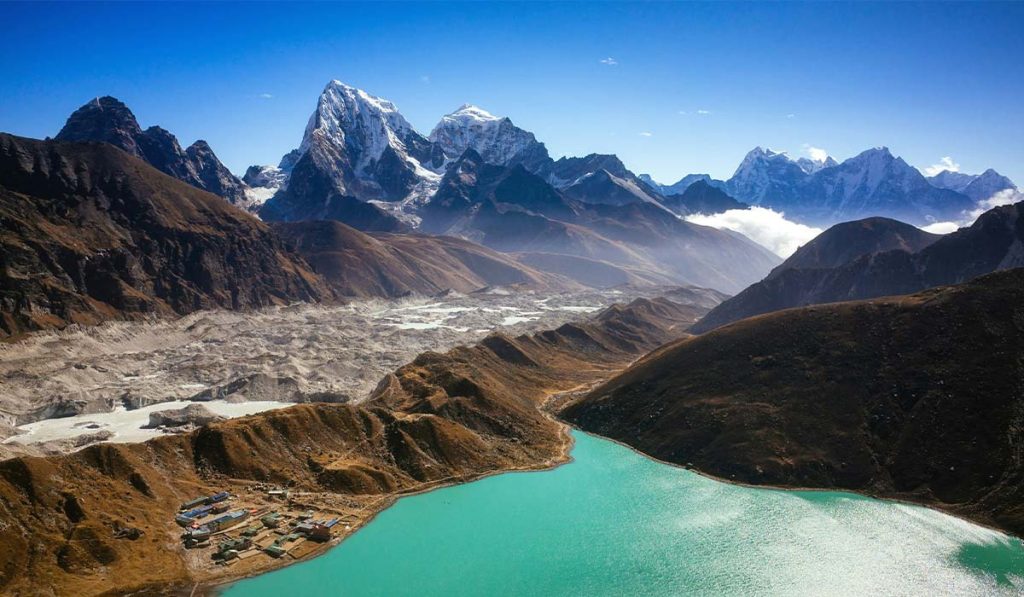
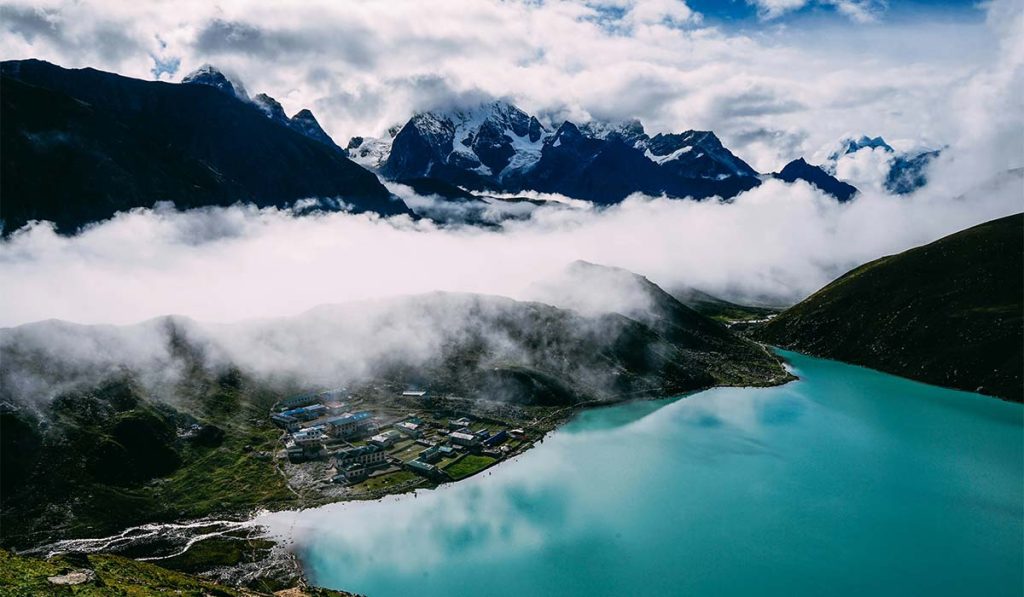
The trail becomes more dramatic as you approach the lakes and the Ngozumpa Glacier. Reaching Gokyo feels different from arriving in a standard village because the setting is much wilder and more open. The lakes, especially in clear weather, are one of the strongest visual rewards in the Everest region.
Day 7: Hike Gokyo Ri and return to Gokyo
This is the highlight day for many trekkers. The climb to Gokyo Ri is steep but short, and the summit view is exceptional. You can see Everest, Lhotse, Makalu, and Cho Oyu, along with the glacier and the chain of lakes below. Start early for the best light and clearer weather.
Day 8: Gokyo to Dole
After the viewpoint, you descend back through Machhermo toward Dole. Descending feels easier on the lungs, but long downhill sections can still be tiring on the knees.
Day 9: Dole to Namche Bazaar
This is a rewarding return day as you drop back into thicker tree cover and more settled terrain. Many trekkers notice how much stronger they feel at lower altitude.
Day 10: Namche to Lukla
The final day is long because you descend steeply and then make the last climb back to Lukla. It is a satisfying finish, but you should still keep enough energy in reserve. Most trekkers stay overnight in Lukla and fly out the next morning, though some itineraries count the exit flight separately.
How difficult is the trek?

The Gokyo route is moderate to challenging. It does not require climbing skills, ropes, or technical mountaineering experience, but the altitude makes it harder than many first-time trekkers expect.
A fit person who hikes regularly can usually complete it. Still, fitness alone does not protect you from acute mountain sickness. Someone very athletic can struggle at 4,500 meters, while a slower, steady trekker may do perfectly well.
Trail conditions are generally good during the main seasons, but there are stone paths, steep sections, cold mornings, and basic lodge conditions at higher stops. If you are comfortable walking several days in a row with uphill and downhill sections, you are likely capable of the route with proper preparation.
Best time for the Gokyo Lakes route
Spring and autumn are the most reliable seasons. From March to May, you usually get stable conditions, moderate temperatures, and good visibility, though haze can sometimes build later in the season. Rhododendrons bloom at lower elevations, which adds color early in the trek.
From late September to November, the skies are often clearest. This is the most popular trekking window because mountain views are excellent and rainfall is low. Nights become colder as the season moves toward winter, especially around Gokyo.
Winter treks are possible for experienced and well-prepared hikers, but cold, snow, and flight delays can complicate the plan. Monsoon season is less ideal because Lukla flights are more easily disrupted and cloud cover often hides the views you came for.
Permits, accommodation, and food
You need the usual permits for the Everest region, which generally include the Sagarmatha National Park entry permit and the local Khumbu area permit. Permit rules can change, so it is always best to confirm current requirements before travel.
Accommodation on this trek is in teahouses. In lower villages, lodges are more comfortable and choices are broader. As you go higher, rooms become simpler, dining rooms get colder, and services become more limited. A warm sleeping bag is important, even if the lodge provides blankets.
Food is straightforward and filling rather than varied. Dal bhat, noodles, rice dishes, soups, potatoes, eggs, and porridge are common. Prices rise with altitude because everything has to be carried in. You should also expect bottled water and charging devices to cost more at higher stops.
Common mistakes on a 10-day schedule
The biggest mistake is underestimating altitude because the trek is only ten days. A short itinerary does not mean an easy one. Skipping acclimatization in Namche or pushing directly from Machhermo to a higher objective can create unnecessary risk.
Another mistake is treating Lukla flights as perfectly reliable. Weather delays are common in the Everest region, so tight international connections can become stressful. Build a buffer day into your overall Nepal travel plan if possible.
Packing too heavily is also common. You need warm layers, rain protection, and good footwear, but you do not need to carry excessive clothing. A lighter bag makes the entire trek more comfortable.
Should you go independently or with a guide?
Both options are possible, depending on current regulations and your experience level. A self-supported trek may suit someone who has trekked at altitude before and is comfortable managing logistics, pacing, and weather decisions. But even experienced hikers can benefit from local support on a high-altitude route.
A guide adds value beyond navigation. Good guides monitor your acclimatization, help adjust the daily plan, deal with lodge arrangements, and recognize problems early. On a route where altitude matters more than trail finding, that practical support can make a real difference.
For first-time Everest region trekkers, guided travel is usually the more sensible option. This is especially true on a tighter itinerary where small delays or poor pacing can affect the whole trip.
Who is this trek best for?
The 10 days Gokyo Lakes Trek is best for trekkers who want a shorter Everest-region adventure with major scenery and fewer crowds than the Everest Base Camp route. It works well for people with limited vacation time who still want a serious Himalayan trekking experience.
It is less suitable for travelers who want very gradual acclimatization, highly comfortable lodging, or a flexible weather buffer built into every stage. If you prefer a slower pace, adding one or two extra days makes the trek safer and more enjoyable.
Done well, this route gives you a rare balance – big mountain reward, strong cultural atmosphere, and a more peaceful trail than many people expect in the Everest region. If you prepare properly, respect the altitude, and keep your itinerary realistic, Gokyo can be one of the most satisfying short treks in Nepal.