The Mardi Himal route gives photographers something many famous treks do not – quick access to dramatic mountain views without needing a long expedition. In just a few days, this Photography guide for Mardi Himal Trek can help you come home with stronger images of Machhapuchhre, Annapurna South, Hiunchuli, forest trails, ridgelines, and changing Himalayan light rather than a memory card full of rushed snapshots.
Mardi Himal is one of the most rewarding short treks in the Annapurna region for landscape photography. The trail moves through dense rhododendron forest, open hillside, high camp terrain, and wide panoramic ridges. That variety matters. It means you are not photographing the same scene every day. Light, weather, and altitude keep changing, and that gives you a far better chance of creating a balanced photo story from the trek.
Why Mardi Himal is excellent for photography
Some treks are famous, but not always easy to photograph well. Busy trails, crowded viewpoints, and long distances between major scenes can make timing difficult. Mardi Himal is different. The route is relatively compact, and many of its strongest views are close to the trail itself.
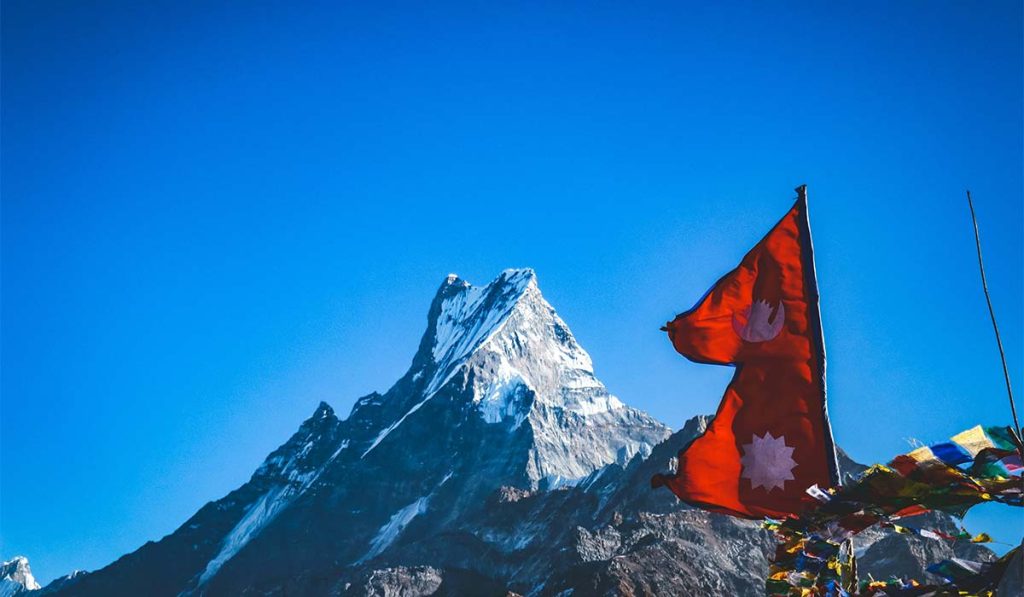
One of the biggest advantages is proximity to Machhapuchhre. Few treks give such an intimate perspective of this mountain. You are not just seeing it on the horizon. On clear mornings, it dominates the frame and changes character with every shift in cloud and sunlight. That makes Mardi Himal especially good for photographers who want dramatic mountain compositions without carrying heavy gear for two weeks.
The second advantage is vertical progression. You begin in the forest, move into mossy and misty sections, then emerge onto open ridges. This creates layers in your image collection. If you plan carefully, your portfolio from the trek can include landscape shots, environmental portraits, trail scenes, weather images, and detail shots of prayer flags, lodges, steps, and alpine vegetation.
Best places to shoot on the Mardi Himal route
The lower forest sections between the Kande or Phedi side access and Forest Camp are not usually where trekkers expect their best photographs, but these areas can be excellent in mist, soft light, or after rain. Tree trunks, rhododendron tunnels, and hanging moss create depth that is hard to find in exposed high-altitude terrain. If you are trekking in spring, blooming rhododendrons can add strong foreground color.
Forest Camp and Low Camp are good for atmosphere rather than big summit panoramas. Early morning cloud moving through the trees often creates moody images. These are also useful places for storytelling shots – teahouses, resting trekkers, and the transition from village life to mountain trail.
Badal Danda is one of the first places where the trek opens up visually. The name itself relates to clouds, and that tells you something important. Conditions change fast here. On a clear evening or morning, you can shoot layered hills below with Machhapuchhre rising behind them. When cloud rolls in, the same viewpoint becomes more dramatic, though less wide and more mood-driven.
High Camp is where many trekkers begin to get their signature images. The landscape is open, the ridge line is photogenic, and the mountains feel close. Sunset can be rewarding here, especially when the last light touches the upper faces while the foreground becomes darker and more textured. Blue hour after sunset can also work well if the sky remains clean.
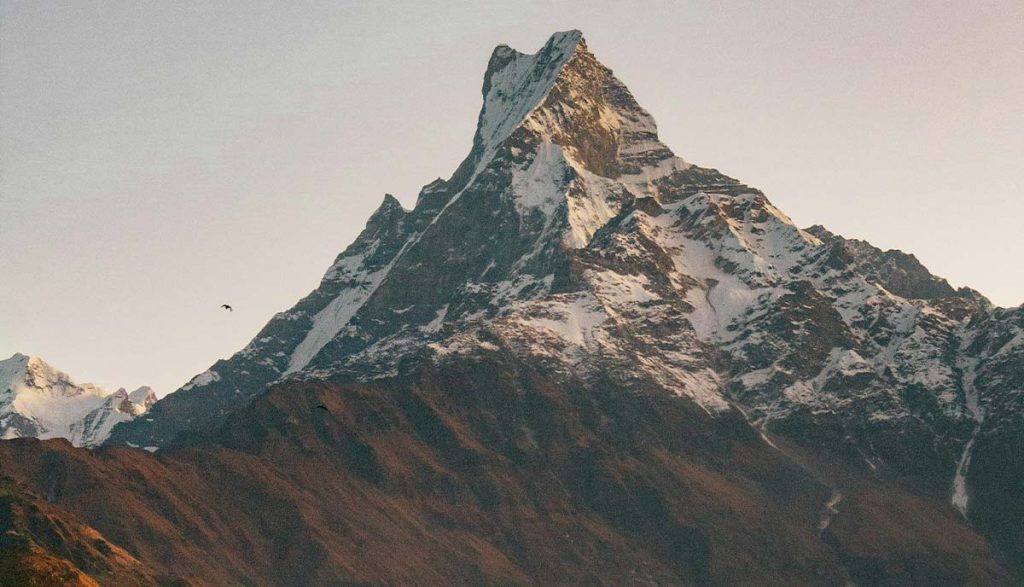
The upper ridge toward Mardi Himal Viewpoint and Base Camp is the photographic highlight of the trek. If the weather is stable, start before sunrise. Dawn light here can be exceptional, especially with Machhapuchhre catching early color. The trail itself also becomes part of the composition – narrow, winding, and suspended above deep valleys. Be careful not to focus only on the obvious wide shot. Turn around too. The receding ridge behind you often creates strong leading lines.
Photography guide for Mardi Himal Trek timing and light
Light matters more than gear on this trek. Midday can still produce usable images, especially in winter when the atmosphere is crisp, but the best mountain photographs usually come early and late in the day.
Sunrise is often the strongest window, particularly from High Camp and the upper viewpoint sections. Morning air is usually clearer, winds are lighter, and cloud buildup is less likely than in the afternoon. If your main goal is sharp mountain photography, give priority to mornings.
Sunset is more mixed. It can be beautiful, but some ridges lose light quickly, and clouds can build by late afternoon, especially outside the clearest seasons. That does not make evening photography pointless. It just means expectations should be realistic. Even when the peaks are partially hidden, evening can be very good for moody ridge images and warm teahouse scenes.
In spring, color and trail life are strong, but haze can reduce distant contrast on some days. In autumn, visibility is often at its best after the monsoon clears the atmosphere. Winter gives very crisp views when conditions are stable, though cold temperatures drain batteries faster and snow can slow movement. Monsoon is the hardest season for classic mountain shots, but forest photography and misty storytelling images can still be excellent.
What camera gear to carry
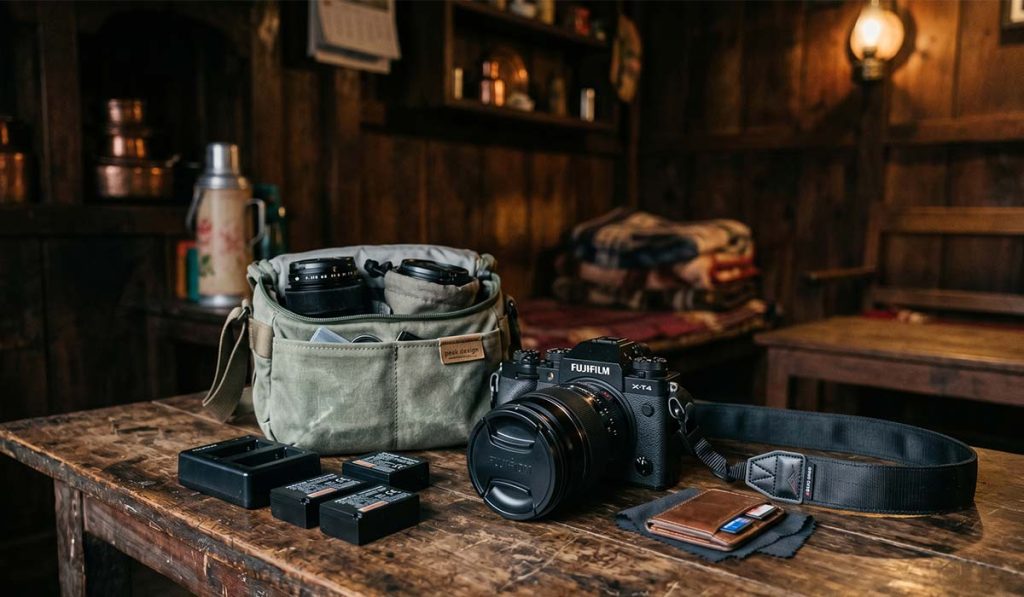
The best setup for Mardi Himal is usually a light one. This is not a trek where carrying your entire kit gives the best result. The trail has steep sections, and if your pack is too heavy, you may end up keeping your camera packed away when the best moments happen.
A mirrorless or DSLR body with a wide-to-mid zoom is enough for most trekkers. A range around 16-35mm or 24-70mm covers most landscapes, lodge scenes, and environmental shots. If you want tighter mountain detail, a short telephoto such as 70-200mm is useful, but it adds weight. Many trekkers can manage with one body and one versatile lens.
Smartphone photography is also realistic on Mardi Himal, especially in good weather. Modern phones handle daylight landscapes very well. The limitation is not basic image quality. It is battery life, lens flexibility, and reduced control in high-contrast scenes. If you are using a phone, prioritize stable handholding, exposure control, and early light.
A compact tripod helps for sunrise, blue hour, and low-light lodge scenes, but it is optional. If you are not comfortable carrying one, do not force it. On this trek, a spare battery, lens cloth, rain cover, and dry bag are often more useful than extra accessories.
Practical shooting tips on the trail
Keep your camera accessible. Many of the best moments on Mardi Himal happen between stops – a sudden clearing in the clouds, a porter crossing a ridge, sunlight breaking through forest, or a mountain face appearing for thirty seconds and disappearing again. If your camera is buried in your bag, you will miss those images.
Use foregrounds whenever possible. Prayer flags, ridge paths, lodge rooftops, yak pastures, and alpine shrubs can turn a standard mountain shot into a more complete composition. The peaks are impressive on their own, but photographs feel stronger when they show place, scale, and route.
Do not overexpose snow or bright cloud. The upper sections can have intense contrast, especially after sunrise. Slightly underexposing and recovering shadows later is often safer than blowing out highlights in the brightest parts of the frame.
Tell the story of the trek, not only the mountains. Photograph boots outside teahouses, steam from morning tea, packed trails, signs, resting points, and the changing terrain. A good trekking gallery should show the experience of getting there, not just the final viewpoint.
Weather, protection, and battery management
Weather on Mardi Himal can change quickly, especially around ridges and camp areas. Clouds can arrive within minutes, and wind can carry dust or moisture onto your lens. Keep a simple weather protection system ready rather than waiting for bad conditions to start.
Cold affects batteries more than many trekkers expect. Keep spare batteries close to your body, especially near High Camp and above. If one dies in the cold, warming it in a pocket can sometimes bring back enough power for more shots.
Condensation is another issue. When moving from cold outdoor air into a warm dining room, let your camera adjust gradually if possible. Sudden temperature change can fog lenses and create moisture problems.
People, culture, and respectful photography
Although Mardi Himal is known mainly for mountain scenery, the human side of the trek matters. Teahouse owners, guides, porters, and fellow trekkers all shape the experience. Portraits and candid images can add warmth and context to your photo set, but ask before taking close portraits. Most people respond well to respectful communication.
Avoid turning every local scene into a photo opportunity. Sometimes the better approach is to observe first, speak a little, and photograph later if it feels appropriate. That usually leads to better images anyway because people appear more relaxed.
A few common mistakes to avoid
The biggest mistake is assuming the best photos only happen at Base Camp. In reality, some of Mardi Himal’s most memorable images come from forest transitions, cloud movement at Badal Danda, and early light near High Camp. Another common mistake is carrying too much gear and using too little of it.
The third mistake is ignoring weather mood. Many trekkers only want clear skies, but partial cloud often creates more depth and drama than empty blue sky. If conditions are shifting, stay patient. The mountain may reveal itself for just a minute, and that minute can give you your best frame of the trek.
If you approach the route with patience, a light kit, and an eye for both landscape and story, Mardi Himal will reward you well. The trail is short enough to stay manageable and rich enough to keep your camera busy from the first forest section to the final ridge above the clouds.